Say Goodbye to Camera-Shyness and High Costs
Have you ever wanted to create an engaging tutorial, a product demo, or a cool social media video, but stopped because you don’t like being on camera? Or maybe you were put off by the cost of professional equipment and actors? What if you could make a static photo “come to life” and speak for you, sharing your message in a new and exciting way?
- Say Goodbye to Camera-Shyness and High Costs
- What Can These AI Tools Do? A Quick Breakdown
- Step-by-Step Guide: Let’s Create Your First AI Talking Avatar Video
- Step 1: Choose or Create Your AI Avatar
- Step 2: Add Your Script (Using the Text to Speech Engine)
- Step 3: Preview and Check the Audio
- Step 4: Generate and Export Your AI Talking Avatar Video
- Pro Tips for Even Better Videos
- Tip 1: For a Realistic AI Talking Photo, Start with a Great Photo
- Tip 2: Use SSML for a Less Robotic Voice
- Tip 3: Clone Your Voice for a Unique Talking Avatar Clone
- Summary and Your Turn to Practice
- FAQ: Frequently Asked Questions
Well, the good news is, now you can! Welcome to the world of the AI Talking Avatar. This is your ultimate guide to using a powerful AI Video Generator to easily turn any photo into a talking character with perfect lip-syncing.
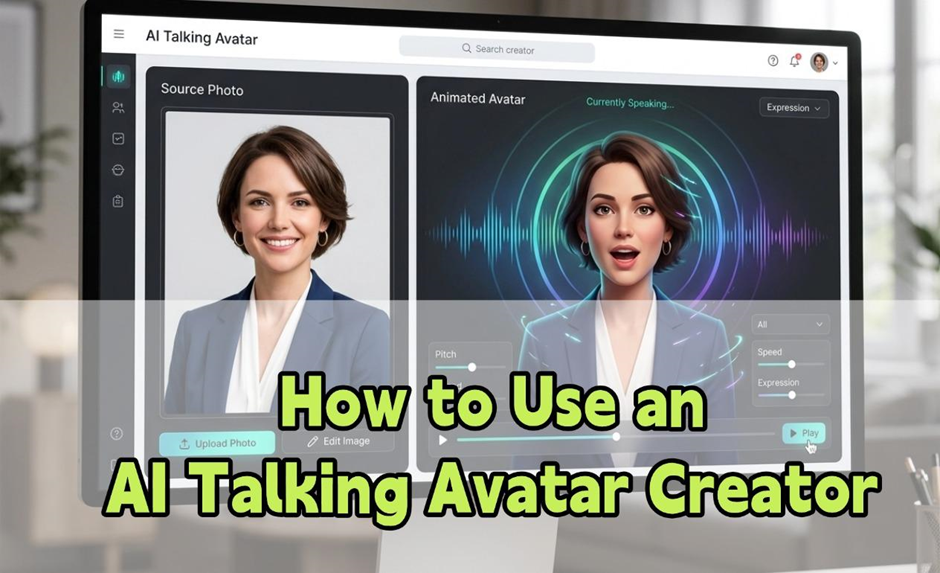
Our Goal Today: In the next 15 minutes, you will go from a complete beginner to confidently creating your first digital human video. By the end of this tutorial, you’ll know how to use an AI Talking Avatar Creator to choose a picture, type in a script, and generate a video with realistic Lip-Sync effects.
What Can These AI Tools Do? A Quick Breakdown
Before we start, let’s understand the magic behind these AI Talking Photo Generator tools. Their power comes from a few key technologies:
- AI Avatar Creation: You can upload any portrait photo (even one of an AI-generated person), and the tool’s algorithm will turn it into a movable AI avatar.
- Advanced Text to Speech (TTS): This is more than just a robotic voice. Modern Text to Speech technology lets you choose different languages, voices, speeds, and even emotions to generate incredibly human-like narration.
- Accurate Lip-Sync Technology: This is the secret sauce that makes an AI Talking Avatar so believable. The AI analyzes the sounds in the audio and automatically matches the mouth movements of the person in the photo, creating a seamless talking effect.
- Talking Avatar Clone: For advanced users, some top-tier tools even allow you to clone your own voice and facial features. This creates a unique Talking Avatar Clone that is 100% yours, which is fantastic for building a personal or company brand.
Understanding these features will help you get the most out of the tool.
Step-by-Step Guide: Let’s Create Your First AI Talking Avatar Video
It’s time to get hands-on! We’ll walk through creating a short “Product Feature” video to show you exactly how it’s done.
Step 1: Choose or Create Your AI Avatar
This is the first and most important step. A great “digital actor” is half the battle.
- Log In and Start Creating: Open your chosen AI Talking Avatar Creator (like HeyGen, D-ID, Synthesia, Vokes AI, etc.). After logging in, you’ll usually see a big button that says “Create Video.” Click it.
- Select an Avatar: You will have a few options:
- Choose from the Library: Most platforms offer a library of pre-made AI avatar models in different styles, ethnicities, and professions. This is the fastest way to get started.
- Create from a Photo: This is our focus. Click the “Upload” or “Create Talking Photo” button.
- Action: Select a clear, front-facing photo from your computer (usually .jpg or .png files work). Key Tip: For the best Free Talking Avatar result, use a photo where the person’s mouth is closed and their face isn’t covered by hair or hands. A high-quality photo leads to a high-quality video.
- Confirm Your Avatar: Once uploaded, the system will process your photo and display it in the editor. Your static picture is now ready to be turned into a talking head by the talking AI image generator.
Alt: Interface for choosing an AI avatar from a library or uploading a photo.


Step 2: Add Your Script (Using the Text to Speech Engine)
Now, let’s give your AI avatar a voice and something to say.
- Find the Text Box: Look for an area on your screen labeled “Text Script.” It’s usually on the right side or at the bottom.
- Type Your Script: This is where you’ll type or paste your product description. For example: “Hello everyone, and welcome. Today, I’m excited to show you our latest product. It uses cutting-edge AI to help you…”
- Configure the Text to Speech Voice:
- Language: Choose your target language, like “English (US).”
- Voice: Click the voice menu. You’ll find many male and female voices to choose from. Listen to a few and pick one that fits your brand’s tone.
- Speed & Pitch: You can use sliders to adjust the speed and pitch to make the voice sound more natural. Pro Tip: To create natural-sounding pauses, use commas and periods in your script. The Text to Speech engine will recognize them as short breaks.
- (Optional) Upload an Audio File: If you already have a voiceover recorded, you can select the “Upload Audio” option and upload your .mp3 or .wav file. The system will then automatically handle the Lip-Sync for it.
Alt: AI tool’s text-to-speech editor with script box and voice options.
Step 3: Preview and Check the Audio
Before creating the final video, a quick preview is essential.
- Click the Preview Button: Look for a “Preview” or a play icon button. Click it.
- Listen Carefully: The system will quickly generate the audio for you. Listen to it to make sure the pronunciation, tone, and pauses are all correct.
- Quick Check: This is just to make sure your audio is perfect. If you notice any mistakes, go back to Step 2 and fix the script.
Step 4: Generate and Export Your AI Talking Avatar Video
Everything is ready. It’s time to see the magic happen!
- Click the Generate Button: Find and click the “Submit” or “Generate Video” button, usually located in the top-right corner.
- Let the AI Work: Your video will be sent to the processing queue. The powerful AI Video Generator will do all the heavy lifting in the cloud, including creating the audio, tracking facial features, and synthesizing the final Lip-Sync. This usually takes a few minutes, depending on the video’s length.
- Download and Share: You’ll get a notification when your video is ready. You can find your new AI Talking Avatar video in your projects or media library. Just click “Download” to save the HD video file (usually an .mp4) to your computer. You’re now ready to share it!
Congratulations! You’ve just created your first Free Talking Avatar video.
Pro Tips for Even Better Videos
Once you’ve mastered the basics, these tips will make your videos look even more professional.
Tip 1: For a Realistic AI Talking Photo, Start with a Great Photo
The quality of your output depends heavily on the quality of your input. When using an AI Talking Photo Generator, choose a photo that is:
- High-Resolution: At least 1024×1024 pixels.
- Well-Lit: Avoid harsh shadows or uneven lighting on the face.
- Facing Forward: The person should be looking directly at the camera. This makes the final video feel more engaging.
- Neutral Expression: A slight smile or a neutral face works best. Avoid big grins or exaggerated expressions, as they can interfere with the Lip-Sync.
Tip 2: Use SSML for a Less Robotic Voice
Many professional Text to Speech engines support Speech Synthesis Markup Language (SSML). By adding simple tags to your text, you can precisely control pauses, emphasis, and tone.
- Example: <break time=”0.5s”/> creates a half-second pause. I <emphasis level=”strong”>really</emphasis> like it will stress the word “really.” Learning to use these simple codes will make your narration sound much more human.
Tip 3: Clone Your Voice for a Unique Talking Avatar Clone
If you’re building a personal brand, consider using the voice cloning feature. You typically need to upload a few minutes of your own voice (recorded in a quiet room). The AI Talking Avatar Creator will then learn your tone and create a voice model that sounds just like you. When you use this with your own photo as the AI avatar, you get a perfect Talking Avatar Clone that lets your audience feel like they are hearing directly from you.
Summary and Your Turn to Practice
Today, we walked through the entire process of using an AI Talking Avatar tool. Let’s recap the key points:
- A high-quality photo is the foundation for a great video.
- Use the advanced options in the Text to Speech engine to create natural-sounding audio.
- The final step is to generate and export the video, bringing your static image to life.
- You can improve your videos by optimizing your source photo and using SSML for better voice control.
Your Homework: Now it’s your turn! Use the skills you learned today to create a 15-second introduction video for one of your social media accounts (like TikTok, Instagram, or YouTube Shorts). Pick a photo you like, write a short introduction, and generate your very first AI Talking Avatar masterpiece!
FAQ: Frequently Asked Questions
Q1: Can I make an AI Talking Avatar video for free? What are the limits?
A: Yes, absolutely. Most AI Talking Photo Generator platforms offer a Free Talking Avatar plan. The typical limitations include a limited amount of video you can generate per month (e.g., 1-5 minutes), a watermark on the final video, fewer avatars and voices to choose from, and no access to premium features like voice cloning. For beginners, a AI Talking Photo Free plan is more than enough to get started.
Q2: The Lip-Sync (mouth movement) in my video looks unnatural. How can I fix it?
A: This is a common issue. Here are a few things you can try to improve the Lip-Sync:
- Simplify Your Script: Make sure the script doesn’t have words that are too fast, complex slang, or unclear pronunciation.
- Try a Different Avatar: Some photos, because of their angle or expression, are harder for the AI to work with. Try a clearer, more front-facing picture.
- Choose a High-Quality Voice: The “Premium” or “Pro” voices offered by the platform are usually clearer, which helps the AI create a more accurate Lip-Sync.
- Contact Support: If the problem persists, it might be an issue with that specific AI Video Generator’s algorithm. Reaching out to their support team can often help.
Q3: Can I clone anyone’s face and voice to make a Talking Avatar Clone? Is that legal?
A: This is a very important ethical and legal question. The answer is absolutely not. You must only use images and voice recordings that you have explicit permission to use or that you own the rights to. Using photos or voices of celebrities, friends, or anyone else without their consent is a violation of their privacy and publicity rights, is unethical, and may be illegal. Always respect the platform’s terms of service and local laws when using any AI Talking Avatar Creator.