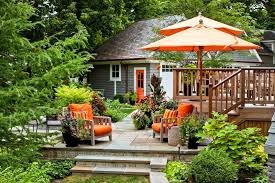
A beautifully landscaped yard does more than just make your neighbors jealous; it transforms your house into a home and significantly boosts your property value. In fact, studies suggest that well-maintained landscaping can increase a home’s resale value by up to 14%. However, for many homeowners, the thought of tackling a landscape overhaul feels overwhelming. Visions of expensive contractors, heavy machinery, and endless weekends of labor often put these dreams on hold.
The good news is that you don’t need a degree in horticulture or a massive budget to make a significant impact. By focusing on manageable, high-impact projects, you can gradually upgrade your outdoor space without the stress. This guide explores seven accessible landscaping projects designed specifically for beginners. These updates will not only enhance your curb appeal but also create an outdoor sanctuary you can enjoy year-round, says Abilene Leasing & Property Management solutions.
1. Create a Low-Maintenance Rock Feature
One of the most effective ways to add texture and contrast to your yard is by incorporating decorative rock. Unlike mulch, rock doesn’t degrade over time, making it a “one-and-done” investment for specific areas of your garden. Creating a dry creek bed or a decorative border around your house foundation can solve drainage issues while looking sophisticated.
When planning a rock feature, transport and volume are often the biggest hurdles for DIYers. Using bulk bags can significantly simplify logistics. For example, if you are looking to update a side yard or create a garden path, utilizing bagged landscape rocks in Midvale allows you to have materials delivered right to the spot you need them, keeping your driveway clean and your back ache-free.
- Pro Tip: Always lay down a high-quality landscape fabric before placing your rocks. This simple step prevents weeds from growing through the stones and keeps your rocks from sinking into the soil over time.
2. Refresh Your Garden Beds with Mulch
If you want an instant facelift for your yard, nothing beats fresh mulch. It provides a clean, uniform look that makes plants pop and gives the entire landscape a manicured appearance. Beyond aesthetics, mulch is a workhorse for garden health. It retains soil moisture, suppresses weeds, and regulates soil temperature.
For a standard garden bed, aim for a depth of two to three inches. This is the “Goldilocks” zone—deep enough to prevent weeds and hold water, but not so deep that it suffocates plant roots. You can choose from various colors, though black and dark brown are popular for their ability to provide a sharp contrast against green foliage.
- Pro Tip: Avoid “volcano mulching,” which is piling mulch high against the trunk of a tree. This traps moisture against the bark and can lead to rot and disease. Instead, leave a few inches of breathing room around the base of the trunk.
3. Plant Perennials for Annual Color
For the homeowner who wants maximum beauty with minimum effort, perennials are the answer. Unlike annuals, which must be replanted every spring, perennials come back year after year, often growing larger and more vibrant with each season. This makes them a cost-effective and time-saving choice for building a lush garden.
Great starter plants include Hostas for shady areas, and Coneflowers or Daylilies for spots that get full sun. These varieties are notoriously hardy and forgiving of beginner mistakes. By planting a mix of varieties that bloom at different times, you can ensure your yard has color from early spring right through to late autumn.


- Pro Tip: Read the plant tags carefully for spacing requirements. It’s tempting to pack plants close together for an instantly full look, but perennials need room to spread out as they mature.
4. Install Garden Edging
The difference between a wild patch of grass and a deliberate garden bed often comes down to one thing: edging. Installing a crisp border between your lawn and your garden beds creates visual separation that looks professionally done. It also serves a practical purpose by preventing grass roots from creeping into your flower beds.
There are many materials to choose from, including natural stone, brick, flexible plastic, or steel. For beginners, brick or flat stone pavers are excellent choices because they don’t require specialized tools to install. You simply dig a shallow trench, lay a base of sand, and place your stones.
- Pro Tip: When installing edging, keep the top of the material flush with or slightly below the cut height of your lawnmower. This allows you to mow right over the edge without needing to go back and use a string trimmer.
5. Embrace Container Gardening
If you are dealing with poor soil conditions or a lack of space, container gardening is a fantastic solution. Pots and planters allow you to control the soil quality perfectly and can be moved around to catch the best sunlight. They add height and architectural interest to patios, porches, and front entryways.
When designing a container, remember the classic “Thriller, Filler, Spiller” formula. Start with a tall, eye-catching plant in the center (the Thriller), surround it with mounding plants (the Filler), and finish with trailing vines that hang over the edge (the Spiller). This technique guarantees a balanced, professional-looking arrangement.
- Pro Tip: Ensure every pot has drainage holes. Without them, water will pool at the bottom of the container, leading to root rot which is the number one killer of potted plants.
6. Illuminate with Solar Path Lights
Lighting is often the forgotten element of landscaping, yet it provides both safety and ambiance. Solar path lights are incredibly beginner-friendly because they require no wiring, no electricity costs, and no trenching. You simply assemble them and stake them into the ground.
Strategic lighting can highlight your favorite trees, guide guests along a walkway, and make your home look welcoming after dark. For the best results, place lights where they will receive at least 6-8 hours of direct sunlight during the day to ensure they stay illuminated well into the evening.
- Pro Tip: Don’t turn your walkway into an airport runway by placing lights in perfectly straight, evenly spaced lines. Staggering them slightly on opposite sides of a path often creates a more natural and pleasing look.
7. Build a Simple Fire Pit Area
Adding a fire pit instantly turns a backyard into a destination. It creates a focal point for social gatherings and extends the usability of your yard into the cooler months. While you can spend thousands on a custom stone setup, a simple DIY version is very achievable for a novice.
You can purchase a freestanding metal fire bowl or build a simple ring using retaining wall blocks. To make it a true feature, clear a circular area of grass, lay down weed barrier, and cover the area with crushed gravel or decorative rock. This provides a safe, fire-resistant base and defines the “living area” of the fire pit.
- Pro Tip: Before buying materials or breaking ground, check your local municipal codes regarding open fires and the required distance from structures and property lines.
Start Your Transformation
Improving your home’s exterior doesn’t require a complete demolition or a professional crew. By tackling these projects one at a time, you can steadily increase your home’s value and your own enjoyment of the space. Whether you start by laying fresh mulch or installing some charming solar lights, the key is simply to begin. With the right materials and a little elbow grease, you can create the outdoor oasis you’ve always wanted.