Every coffee enthusiast knows that the journey to the perfect espresso begins long before the first sip. The OutIn Nano grinder paired with a quality dosing funnel can transform your home brewing setup from amateur to professional-grade, unlocking flavors and consistency you didn’t know were possible.
Home baristas face a common frustration: despite investing in quality beans and equipment, achieving café-quality espresso remains elusive. Uneven grounds distribution, messy countertops, and inconsistent shots plague even the most dedicated coffee lovers. The culprit often isn’t the beans or the machine, but rather the grinding and dosing process that happens in between.
This guide reveals the essential techniques for properly setting up your OutIn Nano grinder and mastering the art of transferring coffee grounds with a dosing funnel. You’ll discover how these simple tools, when used correctly, eliminate common brewing problems and deliver the rich, balanced espresso shots you’ve been chasing. Whether you’re new to home espresso or looking to refine your technique, these practical insights will elevate every cup you brew.
Introduction to the OutIn Nano
The OutIn Nano represents a breakthrough in portable grinding technology, combining precision burr grinding with remarkable compactness. Unlike bulky traditional grinders, this device fits comfortably in your hand yet delivers grind consistency comparable to commercial equipment. Its conical burr mechanism ensures uniform particle size, which directly impacts extraction quality and flavor balance in your espresso.
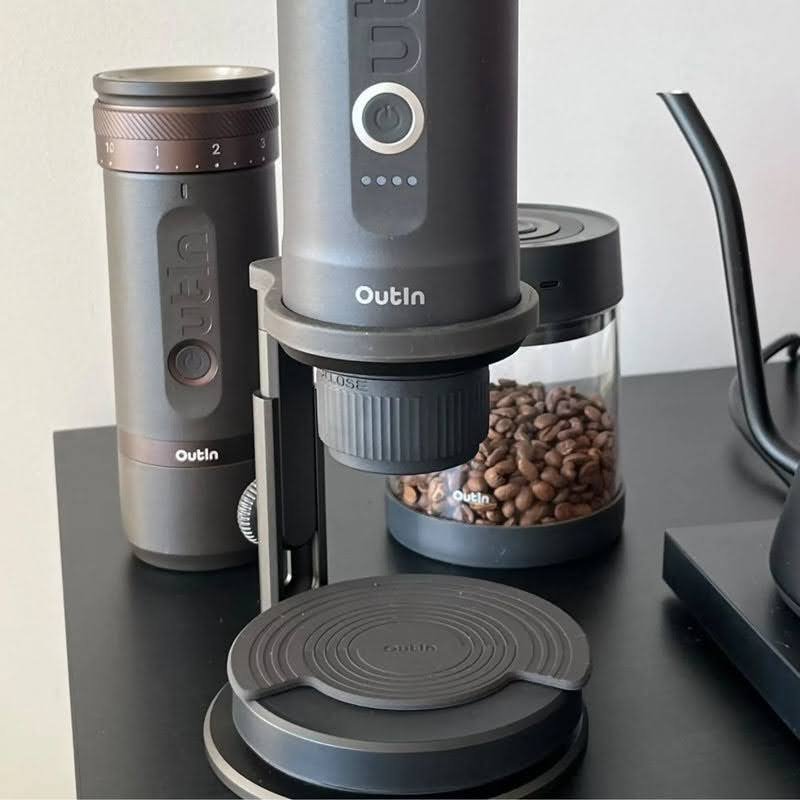
What sets the Nano apart is its versatility across brewing methods. The stepless grind adjustment allows you to dial in the perfect texture for espresso, pour-over, or French press without compromise. The rechargeable battery eliminates cord clutter on your counter, while the transparent chamber lets you monitor the grinding process in real-time. For home baristas working with limited space or those who appreciate the ritual of hands-on brewing, the Nano delivers professional results without the professional footprint. Its consistent performance means you can finally replicate that exceptional café shot in your own kitchen, shot after shot.
Setting Up the OutIn Nano
Begin by charging the Nano fully before first use—the LED indicator will shift from red to green when ready. Remove the top hopper by twisting counterclockwise, then inspect the burr chamber for any protective packaging materials. Adjust the grind setting by rotating the adjustment ring at the base; start at a medium setting around the midpoint for your initial test. Pour your coffee beans into the hopper, filling no more than three-quarters full to prevent jamming. Secure the hopper by aligning the arrow markers and twisting clockwise until you hear a soft click.
Position your Nano on a stable, flat surface near your espresso station but away from water sources. Place a small container or your portafilter directly beneath the grind chute to catch grounds. For hands-free operation, some baristas find placing the grinder on a small silicone mat prevents vibration-related movement during grinding. Keep the charging cable accessible but tucked away to maintain a clean workspace. Before grinding your actual dose, run a small purge batch to clear any residual oils or grounds from previous sessions—this ensures the freshest flavor in every shot.


Using the Dosing Funnel
A dosing funnel acts as a precision collar that attaches magnetically or snaps directly onto your portafilter basket, creating a temporary extension that contains grounds during transfer. To use it effectively, secure the funnel to your portafilter before grinding, ensuring a snug fit that prevents shifting. Grind your dose directly into the funneled basket, allowing the grounds to settle naturally without tapping or shaking. The funnel’s walls contain any overflow and guide stray particles back into the basket, eliminating the mess that typically scatters across your counter.

The primary benefit lies in zero-waste dosing and improved distribution. Without a funnel, grounds pile unevenly in the center of the basket, creating density variations that lead to channeling during extraction. The funnel allows you to use distribution techniques like the Weiss Distribution Technique—gently stirring with a needle tool—without losing precious grounds. This containment also lets you experiment with grind settings and dose amounts confidently, knowing every particle ends up where it belongs. The result is cleaner workflow, more consistent puck preparation, and ultimately better-tasting espresso with less frustration and wasted coffee.
Transferring Coffee Grounds
Once your dose is ground into the funneled portafilter, remove the Nano and set it aside. Gently tap the portafilter sides twice to settle any air pockets, then use a distribution tool or your finger to level the surface in a circular motion. This breaks up clumps and creates an even bed before tamping. Carefully lift the funnel straight upward—avoid twisting, which can disturb your carefully distributed grounds. Any residual grounds clinging to the funnel’s interior can be tapped back into the basket with a light finger tap.
The most common mistake is overfilling the basket before removing the funnel, causing grounds to compress against the funnel walls and create an uneven surface when lifted. Always leave a small gap at the top. Another error is rushing the removal process—yanking the funnel sideways drags grounds with it, undoing your distribution work. Finally, neglecting to wipe the basket rim after funnel removal leaves grounds that compromise your portafilter seal, leading to spurting and uneven pressure during extraction. A quick brush of the rim ensures a clean lock into your group head.
Brewing the Perfect Espresso
With your grounds properly dosed and distributed, lock the portafilter into your machine and start extraction immediately—delays allow the puck to settle unevenly. Aim for a 25-30 second extraction time for a double shot, producing roughly two ounces of espresso. Watch the stream: it should start dark and thick, gradually lightening to a honey-like flow. If extraction runs too fast (under 20 seconds), your grind is too coarse; adjust the Nano’s ring one notch finer. If it drips slowly beyond 35 seconds, go slightly coarser.
Tamping pressure matters less than consistency—apply firm, level pressure of about 30 pounds each time. An uneven tamp creates low-density zones where water rushes through, causing sour, weak flavors. If your shot tastes bitter and over-extracted despite proper timing, reduce your dose by half a gram. Sour, under-extracted shots need either a finer grind or slightly higher dose. Temperature also plays a role: if your machine allows adjustment, keep it between 195-205°F. Small tweaks to these variables, changed one at a time, help you dial in that balanced shot with rich crema and complex flavor notes you’re seeking.
Maintenance and Troubleshooting
Clean your Nano weekly by disassembling the burr chamber and brushing away accumulated coffee oils and fine particles with the included cleaning brush. Remove the hopper, then unscrew the burr assembly by turning counterclockwise. Wipe the burrs with a dry cloth—never use water on the grinding mechanism, as moisture causes corrosion and affects motor performance. Every month, run grinder cleaning tablets through the system following the manufacturer’s instructions to remove stubborn oils that impact flavor. Check the charging port for dust buildup and wipe it gently with a dry cotton swab to maintain proper electrical contact.
If your Nano suddenly stops mid-grind, it’s likely jammed from overfilling or oily beans. Turn off the device, remove the hopper, and manually rotate the adjustment ring back and forth to dislodge stuck particles. Inconsistent grind size usually indicates dull burrs—after grinding approximately 500 pounds of coffee, consider burr replacement. If the motor runs but doesn’t grind, beans may be bridging in the hopper; tap the sides gently or use slightly less coffee per batch. Battery draining quickly suggests it’s time for recalibration—fully discharge then recharge to reset the power management system.
Elevate Your Home Espresso Craft
Mastering the OutIn Nano grinder and dosing funnel combination transforms your home espresso routine from guesswork into precision craft. The proper setup ensures consistent grind quality, while the dosing funnel eliminates waste and creates the even distribution essential for balanced extraction. Together, these tools address the core challenges that separate mediocre shots from exceptional ones—uneven particle distribution, messy transfers, and inconsistent puck preparation.
The techniques covered here aren’t just about cleaner countertops or fancy equipment. They’re about respecting the quality beans you’ve invested in and extracting their full potential. Small adjustments to grind settings, careful funnel removal, and attentive maintenance compound over time, turning daily coffee into a reliable ritual of excellence. Your espresso machine can only work with what you give it, and now you’re equipped to deliver perfectly prepared grounds every single time.
Start implementing these practices tomorrow morning. You’ll immediately notice less mess, and within a week of dialing in your settings, you’ll taste the difference—richer crema, balanced flavors, and that café-quality consistency you’ve been chasing. Your coffee grinder machine experience is about to reach its full potential.