Whether you’re a homeowner looking to modernize your space or a property investor aiming to boost resale value, this guide will walk you through the benefits of cabinet painting, the process, what to expect from professionals, and how to maintain the results for years to come.
Why Cabinet Painting Is a Smart Upgrade
Cabinets are among the most visible and frequently used features in any kitchen, bathroom, or laundry area. Over time, they can begin to look worn, dated, or simply out of sync with current design trends. Many people assume their only option is to replace the entire cabinetry, which can be costly and time-consuming. However, cabinet painting offers several major benefits:
1. Cost Efficiency
Painting cabinets can cost a fraction of what it would take to replace them. While new cabinetry often runs into the thousands (including materials, demolition, and installation), painting allows you to reuse your existing structure and achieve a like-new appearance.
2. Design Flexibility
Cabinet painting gives you access to virtually unlimited color options and finishes. Whether you prefer classic white, deep navy, soft gray, or bold black, you can tailor the look to suit your interior décor or personal style.
3. Reduced Waste
Reusing existing cabinets rather than sending them to a landfill makes cabinet painting an environmentally friendly choice. Many eco-conscious homeowners see this option as a smart and sustainable renovation solution.
4. Faster Turnaround
Whereas a full remodel can take weeks or even months, professional cabinet painting can often be completed in a matter of days, depending on the size of the project.
Ideal Spaces for Cabinet Painting
While kitchen cabinetry is the most popular candidate for painting, there are several other areas in the home where painted cabinets can make a big impact:
- Bathrooms: Repainting vanities in modern or neutral tones instantly upgrades a space.
- Laundry Rooms: A fresh coat of paint can make functional spaces feel clean and cohesive.
- Built-ins and Shelving: Wall units, bookshelves, and entertainment centers can be painted to blend into the room or make a bold statement.
- Closets and Pantries: Even storage spaces can benefit from a visual refresh.
Types of Cabinet Materials That Can Be Painted
Not all cabinets are created equal, but most materials can be painted with the right preparation and techniques. These include:
- Solid Wood: Ideal for painting because of its durability and natural surface.
- MDF (Medium-Density Fiberboard): Common in modern homes and very receptive to paint when properly primed.
- Laminate: Can be painted, although it requires careful sanding and high-quality adhesion primers.
- Veneer: Like laminate, veneer cabinets need thorough surface prep but can achieve excellent results.
Professional painters evaluate the cabinet material before starting to determine the best approach and products.
Cabinet Painting vs. Refacing vs. Replacement
It’s important to understand how cabinet painting compares to other options:
| Method | Description | Cost | Timeline | Visual Impact |
| Painting | Refinish existing cabinets with paint | Low | Short (3–7 days) | High |
| Refacing | Replace cabinet doors/drawer fronts | Medium | Medium (7–14 days) | High |
| Replacement | Remove and install brand-new cabinets | High | Long (2–4+ weeks) | High |
While all three have their place, cabinet painting provides an unbeatable mix of affordability, speed, and impact.
The Professional Cabinet Painting Process
Painting cabinets may sound simple, but achieving a flawless, factory-smooth finish takes preparation, the right tools, and skilled technique. Here’s what a typical professional process looks like:
1. Initial Consultation
A professional painter will inspect your cabinets, discuss color choices, finishes (matte, satin, gloss), and help you understand the scope of work.
2. Surface Preparation
All cabinet doors, drawer fronts, and hardware are removed. Surfaces are thoroughly cleaned with degreasers to eliminate cooking residue, oils, and dirt. This step is essential for proper paint adhesion.
3. Sanding
Cabinets are sanded to remove the existing finish and create a texture for primer and paint to adhere to. Even minor imperfections are smoothed out.
4. Priming
A high-adhesion primer is applied to all surfaces. This seals the cabinet material and ensures a strong, even bond with the paint.
5. Painting
Using professional-grade sprayers or brushes/rollers designed for fine finishes, painters apply multiple thin coats of premium cabinet paint. Drying times are respected between coats to prevent bubbling or streaking.
6. Curing and Reassembly
Once the paint has cured (not just dried), hardware is reinstalled and cabinets are reassembled. Some professionals even offer new hardware installation as part of the service.
Paint Types and Finishes for Cabinets
Cabinet surfaces endure frequent use, so not just any wall paint will do. Professional-grade products are essential.
Best Paint Options:
- Alkyd-Based Paints: Offer the finish and durability of oil-based paints with water-based cleanup.
- Acrylic Enamels: Known for their durability, smooth finish, and resistance to chipping.
- Urethane-Modified Paints: These offer the toughest finish for high-use cabinets.
Finish Choices:
- Matte: Modern and stylish, but not as easy to clean.
- Satin: Popular for cabinetry due to its subtle sheen and cleanability.
- Semi-Gloss: Reflects more light and is highly durable.
- Gloss: Sleek and modern, but highlights imperfections.
How to Choose the Right Cabinet Colors
Color can define the mood and style of an entire room. Here are some tips for choosing the right cabinet color:
- White or Off-White: Timeless, clean, and versatile.
- Gray: Neutral and modern, great for both traditional and contemporary homes.
- Navy or Dark Blue: Dramatic and bold, often paired with brass or gold hardware.
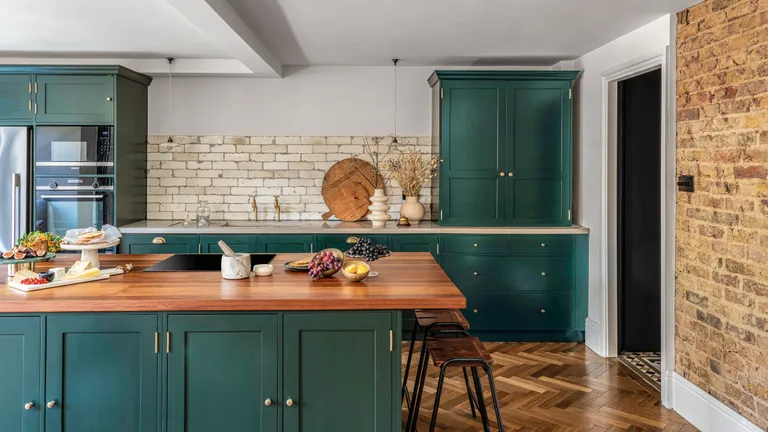
- Earthy Greens: Calming and natural, increasingly popular in kitchens.
- Two-Tone Styles: Upper and lower cabinets painted in different shades for contrast.
When in doubt, many painters offer sample swatches or small test areas to help you visualize the final result before committing.
Maintaining Painted Cabinets
With proper care, painted cabinets can look beautiful for 8–10 years or more. Here’s how to keep them in great condition:
- Clean Regularly: Wipe down cabinets with a soft cloth and gentle soap to remove oils and dust.
- Avoid Abrasive Cleaners: These can damage the finish or dull the sheen.
- Handle with Care: Avoid slamming doors or dragging heavy items across drawers.
- Touch-Up Paint: Keep extra paint labeled for future touch-ups if needed.
- DIY vs. Hiring a Professional
While DIY cabinet painting is possible, it comes with many challenges:
| Factor | DIY | Professional Painter |
| Tools Needed | Brushes, sprayers, degreasers, sanders | Commercial-grade tools & materials |
| Time Commitment | 1–2 weeks or more | 3–7 days typically |
| Finish Quality | May have brush strokes, drips, streaks | Smooth, durable, factory-like finish |
| Durability | Variable depending on prep | Long-lasting, chip-resistant results |
Professionals bring expertise that ensures long-lasting beauty, while DIY may result in a look that doesn’t hold up over time.
Final Thoughts
Cabinet painting is a powerful and accessible way to upgrade your interior spaces without the mess or cost of a full remodel. It offers the freedom to explore fresh color schemes, the satisfaction of a clean new look, and the confidence that your cabinetry will hold up to daily use.Whether you’re preparing your home for sale, refreshing an outdated kitchen, or simply ready for a style change, hiring a skilled professional for your cabinet painting project is a worthwhile investment. With the right preparation, materials, and craftsmanship, you can enjoy a beautiful, refreshed space that feels brand new—at a fraction of the cost of replacement.