A fresh landscape often starts with removing the old. Whether you’re preparing your yard for a garden, installing artificial turf, adding hardscaping, or simply replacing an unhealthy lawn, sod removal is a critical first step. While it might seem like a straightforward task, removing sod properly requires strategy, tools, and some know-how to ensure a clean slate without damaging the soil beneath.
- 1. Installing a New Lawn
- 2. Preparing for a Garden or Landscape Feature
- 3. Transitioning to Xeriscaping or Artificial Turf
- 4. Weed and Pest Control
- 1. Manual Sod Removal
- 2. Sod Cutter
- 3. Smothering
- 4. Herbicide Application
- Step 1: Mark the Area
- Step 2: Water the Lawn (But Not Too Much)
- Step 3: Cut the Sod
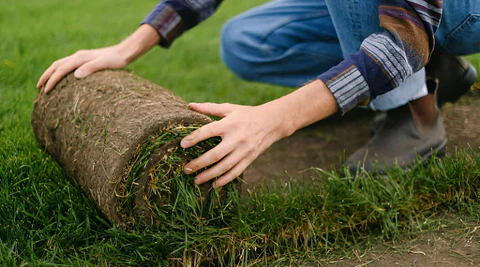
- Step 4: Roll or Lift the Sod
- Step 5: Dispose of the Sod
- Step 6: Prepare the Soil
- 1. Install New Sod or Seed
- 2. Build Hardscaping
- 3. Start a Garden or Raised Bed
- 4. Install Artificial Turf
- Benefits of Hiring Experts:
Sod is more than just grass—it’s a layer of living turf complete with roots and soil that can be stubbornly attached to the ground. Poor or rushed removal can lead to uneven terrain, compacted soil, and long-term issues with your new landscape project. This guide will walk you through every aspect of sod removal: when it’s needed, how it’s done, common mistakes to avoid, and how to prepare the area for whatever comes next.
Whether you’re a homeowner tackling a DIY project or considering professional help, understanding the ins and outs of sod removal is essential to creating a clean, healthy foundation for your new outdoor space.
What Is Sod Removal and When Is It Necessary?
Sod removal involves cutting and lifting the top layer of grass and soil from your lawn or landscape. This process is more than just ripping out grass—it requires removing the entire sod layer, which includes roots, organic matter, and often a few inches of compacted soil.
Here are common reasons why sod removal is necessary:
1. Installing a New Lawn
If your existing grass is patchy, invasive, or beyond repair, starting over may be your best bet. Removing old sod allows for proper grading, soil amendment, and fresh turf installation—either by seed or new sod.
2. Preparing for a Garden or Landscape Feature
When adding planting beds, pathways, patios, or other features, a clean base is essential. Sod must be removed to expose bare soil, which is easier to grade, dig, and build upon.


3. Transitioning to Xeriscaping or Artificial Turf
Sod doesn’t have a place in low-maintenance or drought-tolerant landscaping. Removing it makes room for gravel, mulch, or synthetic turf while improving drainage and reducing maintenance.
4. Weed and Pest Control
In some cases, pest infestations or invasive weeds are too deep-rooted to fix with spot treatments. Removing the sod helps eliminate the problem at its source.
Methods of Sod Removal
There are several ways to remove sod, each with pros and cons depending on the size of the area, budget, and what you plan to do afterward. Below are the most common approaches:
1. Manual Sod Removal
Tools Needed:
- Flat shovel or spade
- Garden hoe or mattock
- Wheelbarrow
- Gloves and back support belt
Process:
Use a flat shovel or spade to cut under the sod layer and lift it in sections. This is best for small areas, raised beds, or tight spots where machines can’t reach.
Pros:
- Low-cost
- Precise control in small or tight areas
- Good exercise (if that’s what you’re looking for!)
Cons:
- Labor-intensive and time-consuming
- Can be physically demanding
2. Sod Cutter
A sod cutter is a machine that slices under the grass, allowing you to roll up sod in strips for easy removal.
Types:
- Manual sod cutters (for smaller jobs)
- Gas-powered sod cutters (for larger areas)
Pros:
- Fast and efficient
- Produces clean, rollable sod strips
- Saves physical strain
Cons:
- Equipment rental costs
- Learning curve for use
- Not ideal for extremely rocky or sloped terrain
3. Smothering
This long-term method involves covering sod with plastic sheets, cardboard, or thick mulch to block sunlight and water, effectively killing the grass.
Pros:
- No tools or physical labor
- Eco-friendly
- Adds organic matter to soil
Cons:
- Takes several weeks or months
- Not suitable if you’re on a deadline
4. Herbicide Application
Applying non-selective herbicides can kill the sod, making removal easier. This is usually followed by tilling or scraping the area.
Pros:
- Easy for large areas
- Minimal physical effort
Cons:
- Delays planting
- May impact soil health or nearby plants
- Not organic
How to Remove Sod Effectively: Step-by-Step Guide
Here’s a clear process for removing sod, particularly if you’re using a sod cutter or manual method:
Step 1: Mark the Area
Use spray paint or string to outline the area where sod needs to be removed. Be precise to avoid removing too much or too little.
Step 2: Water the Lawn (But Not Too Much)
Lightly water the area a day before removal. Moist soil makes it easier to cut sod without creating muddy conditions.
Step 3: Cut the Sod
Using your chosen tool or machine, slice the sod in even, straight strips about 12–18 inches wide. For larger areas, use a gas-powered sod cutter to maintain consistency.
Step 4: Roll or Lift the Sod
Roll up each strip like a carpet if you plan to reuse or compost it. Otherwise, cut it into manageable pieces for disposal.
Step 5: Dispose of the Sod
Options include:
- Composting
- Relocating to another area
- Green waste disposal (via bins or hauling service)
Avoid dumping sod in places where invasive grasses can regrow.
Step 6: Prepare the Soil
After sod removal, till and rake the soil to break up compaction. Remove any remaining roots, rocks, or debris. You may also want to mix in compost or topsoil to improve texture and fertility.
What to Do After Sod Removal
The next steps depend on your goals for the newly cleared space. Here are some common directions people take:
1. Install New Sod or Seed
After removing old grass, it’s important to test and amend the soil before laying new sod or applying seed. This ensures healthy growth and helps avoid the issues that caused you to remove the old lawn in the first place.
2. Build Hardscaping
For patios, pathways, or retaining walls, sod removal gives you a clean starting surface. Make sure the area is graded correctly before construction begins.
3. Start a Garden or Raised Bed
Apply compost or soil amendments, and dig in planting beds for shrubs, flowers, or vegetables. Sod-free ground is much easier to work with and won’t compete with roots.
4. Install Artificial Turf
After sod removal, the area can be leveled and topped with a base layer of sand or gravel. This prevents weeds and ensures proper drainage under the synthetic turf.
Common Mistakes to Avoid
Even though sod removal seems straightforward, it can go wrong without the right preparation. Here’s what to avoid:
- Not Planning for Disposal: Sod is heavy and bulky—have a plan before you start cutting.
- Working on Dry or Rocky Soil: Watering beforehand makes cutting easier and reduces wear on tools.
- Skipping Soil Prep: Once the sod is gone, take time to loosen, grade, and amend the soil.
- Ignoring Utilities: Always call before you dig—removing sod can expose or damage underground lines.
- Leaving Roots Behind: Lingering root systems can regrow or interfere with new installations.
DIY vs. Professional Sod Removal
While many homeowners take the DIY route, hiring professionals foris a great option for large areas, steep terrain, or tight schedules.
Benefits of Hiring Experts:
- Fast, clean, and consistent results
- Proper disposal of removed sod
- Grading and soil prep often included
- Saves time and physical effort
If you’re unsure about the scope of your project or need the job done quickly, professional services can ensure your outdoor project starts on the right foot.
Environmental Considerations
Before removing your lawn, consider the environmental impact:
- Composting Sod: Turning old sod into compost helps return nutrients to the soil and reduces waste.
- Replacing with Native Plants: Use the opportunity to install native or drought-tolerant landscaping.
- Avoiding Chemicals: Skip herbicides if possible to protect soil health and surrounding plants.
Removing sod doesn’t just clear the way—it’s also a chance to create a more eco-conscious and sustainable outdoor environment.
Final Thoughts
Sod removal might seem like just the first step in a larger project, but it’s a foundational task that influences everything that comes after. Done properly, it creates a clean canvas for planting, building, or redesigning your outdoor space. Done poorly, it can lead to uneven terrain, poor drainage, or soil that’s too compacted to work with.
From choosing the right tools to prepping your soil for the next phase, every step in sod removal matters. Whether you take on the task yourself or hire a professional team, understanding the process empowers you to make smart decisions and get better, longer-lasting results.
If you’re preparing for a landscape transformation, make sure sod removal is done right—it’s not just about taking grass away. It’s about setting your project up for long-term success from the ground up.