Imagine you’re working on a DIY project or troubleshooting an electrical issue, and suddenly you need to check if a wire is functioning properly. This is where continuity testing comes into play. With just a multimeter in hand, you can quickly determine whether there’s a complete path for electricity to flow. Whether you’re an experienced electrician or a weekend warrior tackling household repairs, mastering continuity testing on a multimeter can save you time and frustration.
- Understanding continuity testing on a multimeter
- The Importance of continuity testing on a multimeter
- How to Use a Multimeter for continuity testing on a multimeter
- Step-by-Step Guide to continuity testing on a multimeter
- Common Issues and Troubleshooting Tips
- Safety Precautions when Conducting a continuity testing on a multimeter
- Conclusion
In this guide, we’ll delve deep into the world of continuity testing—its significance, how to perform it effectively with your multimeter, and what common pitfalls to watch out for. Get ready to empower yourself with knowledge that will elevate your skills and confidence in any electrical task!
Understanding continuity testing on a multimeter
Continuity testing on a multimeter is a fundamental process that helps you check if an electrical circuit is complete. When current flows through a conductor, it indicates continuity. If the path is broken or there’s an issue, you’ll know right away.
Most multimeters have a dedicated continuity mode, often marked by a sound wave symbol. This feature allows the device to emit an audible beep when there’s continuity. It makes identifying issues quick and straightforward.
Understanding how your multimeter operates in this mode can save time during troubleshooting. You’ll be able to pinpoint problems without guessing where potential faults lie.
Using this simple test can prevent more extensive damage down the line and ensure your devices run smoothly. Familiarizing yourself with these basics sets the stage for effective use of your multimeter in various applications.
The Importance of continuity testing on a multimeter
Continuity testing on a multimeter is crucial for any electrician or DIY enthusiast. It helps identify broken connections in circuits, ensuring everything operates smoothly.
When you check continuity, you’re verifying that electricity can flow through a wire or component without interruption. This simple test can save time and prevent costly mistakes during repairs or installations.


Additionally, it enhances safety by detecting faults before they lead to potential hazards like short circuits or electrical fires. Regularly performing continuity tests can extend the lifespan of your devices as well.
Whether you’re troubleshooting an appliance or working on home electrical projects, understanding this fundamental aspect of multimeters is vital. The peace of mind that comes with knowing your connections are sound cannot be understated.
How to Use a Multimeter for continuity testing on a multimeter
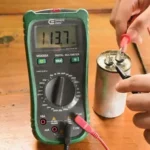
Using a multimeter for continuity testing is straightforward and essential for diagnosing electrical issues. First, set your multimeter to the continuity mode. This setting often features a symbol resembling sound waves or a diode.
Next, take the probes of the multimeter—one red and one black—and connect them to the points you want to test. Typically, you’ll place one probe on each end of a wire or component.
If there’s continuity, meaning electric current can flow freely between the two points, your meter will beep or display a reading close to zero ohms. If it doesn’t beep or shows an infinite reading, there’s likely an issue with that connection.
Make sure you’re working in a safe environment without power running through the circuit during testing. That ensures both your safety and accurate readings from your device.
Step-by-Step Guide to continuity testing on a multimeter
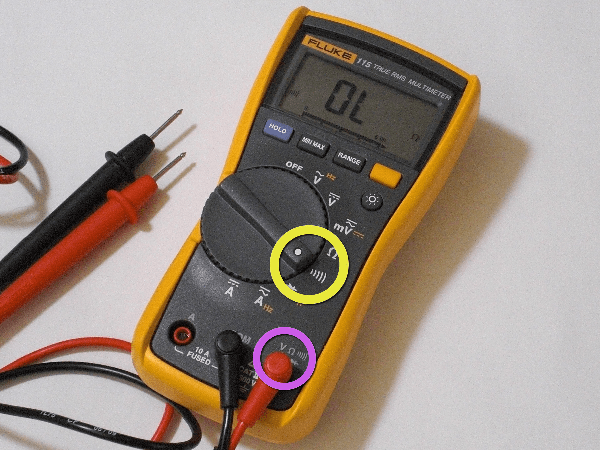
Start with your multimeter set to the continuity mode. This setting is usually indicated by a sound wave symbol or diode icon.
Next, ensure that the probes are securely connected to the multimeter. The black probe typically goes into the COM port, while the red probe connects to the VΩmA port.
Now, take your two probes and touch them together. You should hear a beep or see a visual indication on your screen. This confirms that your multimeter is functioning correctly.
To test continuity in a circuit, place one probe at each end of the wire or component you want to check. If there’s continuity, you’ll hear a beep or see an indicator light up. No sound? Then there’s likely an issue with connection or integrity in that part of your circuit.
Remember to remove any power source before testing live circuits for safety reasons.
Common Issues and Troubleshooting Tips
When performing continuity testing on a multimeter, you may encounter a few common issues that can throw off your readings. One frequent problem is the probes not making proper contact with the circuit or wires. Ensure they are securely connected and free of dirt or corrosion.
Another issue might be an improperly set multimeter. Double-check that it’s switched to the correct setting for continuity testing, usually indicated by a soundwave symbol. If you’re still getting inconsistent results, it could indicate a dead battery in the multimeter itself.
Sometimes, unexpected resistance in the circuit can lead to misleading readings too. This may occur if other components are influencing measured values. To overcome this, isolate sections of your circuit and test each part independently for accurate results.
If nothing seems off but you’re still struggling with readings, consider replacing your leads as worn-out probes can affect performance significantly.
Safety Precautions when Conducting a continuity testing on a multimeter
When conducting continuity testing on a multimeter, safety should always be your top priority. Begin by ensuring that the device you are testing is completely de-energized. This can prevent any unexpected shocks or damage to your equipment.
Next, make sure to wear appropriate personal protective equipment. Safety goggles and gloves can provide an extra layer of protection against accidental contact with live parts.
It’s also wise to inspect your multimeter before use. Check for damaged leads or a faulty display; these issues could lead to inaccurate readings or hazardous situations.
Keep your workspace organized and free from distractions. A cluttered environment increases the risk of mistakes, which can compromise both safety and accuracy in testing.
Understand the specifications of the components you’re working with. Knowing their ratings will help you avoid exceeding safe limits during continuity tests.
Conclusion
Continuity testing on a multimeter is an essential skill for anyone working with electrical circuits. It allows you to determine if there are any breaks in the circuit that could cause devices to malfunction. By understanding how to use your multimeter effectively, you can save time and avoid unnecessary frustration.
The importance of continuity testing cannot be overstated, as it helps in diagnosing electrical issues swiftly. Following a step-by-step guide makes this process straightforward. Knowing common problems and troubleshooting tips will further enhance your ability to resolve issues efficiently.
Safety should always be a priority when conducting tests with a multimeter. By following proper precautions, you not only protect yourself but also ensure accurate results.
Embracing these techniques empowers you as a DIY enthusiast or professional technician alike. Mastering continuity testing opens the door to deeper comprehension of electrical systems and enhances your problem-solving capabilities significantly, making every project smoother and more successful.