Introduction to how to test a capacitor with a multimeter
Capacitors are the unsung heroes of electronic devices, quietly performing their duties in everything from your favorite gadgets to household appliances. But what happens when they start to fail? A malfunctioning capacitor can lead to a cascade of issues, disrupting functionality and even causing serious damage. Luckily, with just a multimeter—a handy tool that measures electrical properties—you can check whether your capacitors are in good shape or need replacing. This guide will walk you through how to test a capacitor with a multimeter, ensuring you keep your electronics running smoothly and efficiently. Let’s dive into the world of capacitors and get started!
- Introduction to how to test a capacitor with a multimeter
- Why Testing a Capacitor is Important
- Types of Capacitors and Their Functions
- Materials Needed for Testing a Capacitor with a Multimeter
- Step-by-Step Guide on How to Test a Capacitor with a Multimeter
- Troubleshooting Common Issues During Testing
- Conclusion: Importance of Regularly Testing Your Capacitors
Why Testing a Capacitor is Important
Testing a capacitor is crucial for several reasons. Capacitors play an essential role in electronic circuits, storing and releasing energy as needed. A faulty capacitor can lead to circuit failures or inadequate performance.
When capacitors fail, they may cause devices to malfunction. This could result in anything from a flickering display on your television to complete power loss in appliances. Regular testing helps prevent such unexpected issues.
Moreover, identifying failing capacitors early can save money on repairs or replacements of entire circuits or devices. By keeping tabs on their condition, you ensure your electronics function smoothly and efficiently.
Another important aspect involves safety. Capacitors can store significant voltage even after being unplugged. Testing ensures that you’re working with safe components when conducting repairs or maintenance tasks around the house or workplace.
Types of Capacitors and Their Functions
Capacitors come in various types, each serving unique purposes. Ceramic capacitors are widely used due to their stability and reliability. They’re often found in high-frequency applications like radio transmitters.
Electrolytic capacitors, recognizable by their polarized nature, excel at storing large amounts of charge. You’ll commonly see them in power supply circuits and smoothing applications.
Tantalum capacitors are similar to electrolytics but offer a more compact design and better performance under specific conditions. They find roles in gadgets where space is a premium.

Film capacitors stand out for their durability and low loss characteristics. These are ideal for audio equipment where sound quality matters the most.
Supercapacitors push the boundaries further, enabling rapid charging and discharging cycles. Their role is crucial in energy storage systems or regenerative braking technologies. Each type has its strength tailored to particular electronic needs.
Materials Needed for Testing a Capacitor with a Multimeter
To test a capacitor with a multimeter, you’ll need a few essential materials. First and foremost, grab a reliable digital multimeter. This tool is key for measuring voltage, resistance, and capacitance.
Next on your list should be safety gear. A pair of insulated gloves can protect you from accidental shocks while handling charged capacitors.
You might also want to have some alligator clips handy. They make connecting the capacitor leads to your multimeter more straightforward and secure.
Don’t forget about a discharge tool or resistor. Discharging the capacitor before testing ensures safety by preventing any residual charge from causing harm during measurement.
With these materials ready, you’re well-equipped to start testing those capacitors effectively!
Step-by-Step Guide on How to Test a Capacitor with a Multimeter
Start by ensuring your safety. Always unplug the device containing the capacitor before you begin any testing.
Next, locate the capacitor on your circuit board or device. Take note of its polarity if it’s an electrolytic capacitor; this will matter during testing.
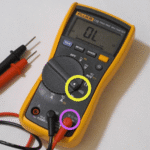
Set your multimeter to the capacitance measurement mode. This is usually indicated by a symbol resembling two parallel lines with a curve in between.
Carefully discharge the capacitor using a resistor to avoid electric shock. Do this by connecting one end of a resistor to each terminal for several seconds.
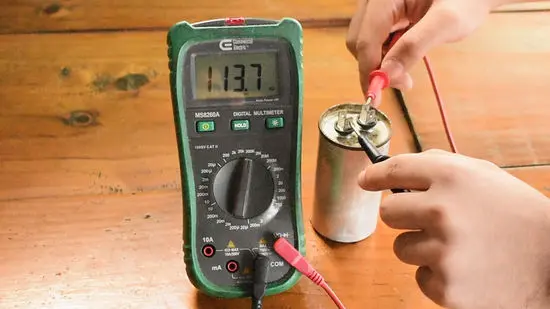
Now, connect the multimeter probes to the appropriate terminals of the capacitor. For non-polarized capacitors, it doesn’t matter which probe goes where.
Watch for a reading on your multimeter display. Compare this value against what’s printed on the capacitor itself—the actual capacitance should be within tolerable limits based on manufacturer specifications.
Troubleshooting Common Issues During Testing
When testing a capacitor with a multimeter, you may run into some common issues. One of the first signs of trouble is inaccurate readings. Ensure your multimeter is set to the correct range for capacitance measurement. If it’s not calibrated properly, that could lead to misleading results.
Another issue could be residual charge in the capacitor. Always discharge capacitors before testing by using a resistor or shorting leads together safely. This step prevents dangerous shocks and protects your equipment.
If you notice fluctuating values during measurement, check for loose connections or damaged probes. A solid connection is crucial for accurate readings.
If you’re dealing with electrolytic capacitors, keep an eye out for any physical damage like bulging or leaking fluid; these are clear indicators that replacement is needed rather than just testing.
Conclusion: Importance of Regularly Testing Your Capacitors
Regularly testing your capacitors is crucial for maintaining the reliability of your electronic devices. Over time, capacitors can degrade or fail, leading to poor performance or complete device failure. By understanding how to test a capacitor with a multimeter and performing periodic checks, you can identify issues before they escalate.
This simple maintenance step not only extends the life of your electronics but also ensures that everything functions smoothly. Whether you’re an experienced technician or a hobbyist, incorporating regular capacitor tests into your routine will save you time and money in the long run. Taking these proactive measures helps ensure that your devices remain efficient and effective throughout their lifespan.