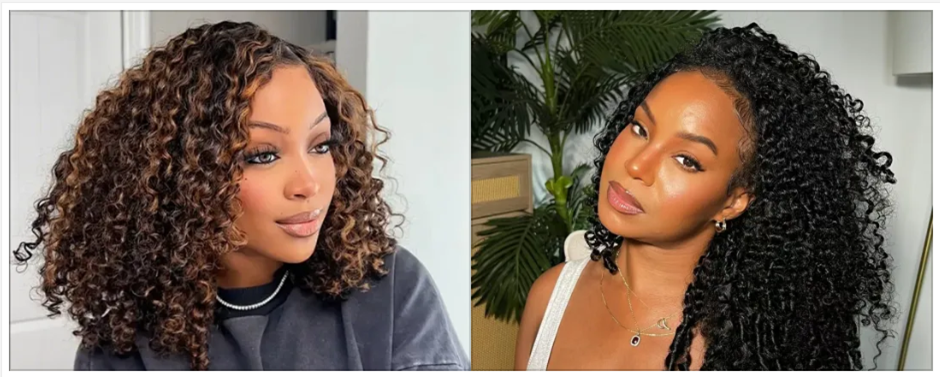
In today’s fast-paced world, busy women need products that help them look their best without sacrificing time or convenience. Whether you’re juggling work, family, or social life, finding beauty solutions that fit your hectic schedule is crucial. Enter the BGMgirl Burmese Curly Wig and Half Wig—two game-changers in the world of wigs, designed to give you a flawless look in a matter of minutes.
If you’re always on the go and need a quick and easy way to transform your hair, these wigs are perfect for you. In this guide, we’ll show you how to easily install both the Burmese Curly Wig and the Half Wig so you can rock your best look in no time.
1. Why BGMgirl Wigs Are Perfect for Busy Women
Before we dive into the installation process, let’s take a quick look at why the BGMgirl Burmese Curly Wig and Half Wig are ideal for busy women:
- Instant Style: Both wigs come pre-styled, so you don’t have to spend hours curling, straightening, or adding volume. They’re ready to wear, helping you save time and effort.
- Natural Look: The quality materials used in BGMgirl wigs (including 100% human hair for the Burmese Curly Wig) make them look incredibly natural, even close up. This means you don’t need to worry about a wig-looking wiggy.
- Comfort and Breathability: Both the Burmese Curly Wig and Half Wig are lightweight and breathable, making them comfortable to wear all day, even in hot or busy environments.
- Versatility: Whether you need an everyday look or a style for a night out, these wigs adapt to your needs. The Burmese Curly Wig adds volume and texture, while the Half Wig gives you flexibility by allowing you to blend it with your natural hair.
2. Installing the BGMgirl Burmese Curly Wig
If you want a full, voluminous curly look, the Burmese Curly Wig is the way to go. Here’s how to install it quickly and effortlessly:
Step-by-Step Guide:
1. Prepare Your Natural Hair:
Start by preparing your natural hair for the wig. This ensures a smooth and secure fit. Depending on the length and thickness of your hair, you have a couple of options:
- For Short Hair: You can simply comb your hair flat against your scalp.
- For Longer Hair: Use a low bun or braid to keep your hair close to your head. You can also pin down any stray hairs with bobby pins.
2. Put on a Wig Cap:
Wearing a wig cap will help hold your natural hair in place and create a smooth base for the wig to sit on. Choose a wig cap that matches your skin tone for a more seamless look. Gently pull it over your head, ensuring that your natural hair is tucked in securely.
3. Adjust the Wig:
Now, it’s time to grab your Burmese Curly Wig. Before putting it on, take a moment to adjust the wig’s straps (located inside the cap) to fit your head comfortably. If your wig is a little too tight or loose, the adjustable straps will give you that perfect, snug fit.
4. Put the Wig On:
Place the wig on your head starting from the front (your forehead) and pull it down toward the back. Gently tug the wig into place, making sure it sits securely. Use your fingers to smooth out any tangles and ensure that the curls fall naturally.


5. Blend the Hairline:
Once the wig is on, check the edges to ensure they blend smoothly with your natural hairline. If you’re wearing a wig cap, you can tuck in any visible edges or adjust the cap so that it’s completely hidden. For added security, you can use some light styling gel or edge control along your natural hairline to keep everything in place.
6. Style and Go:
The great thing about the Burmese Curly Wig is that it already comes with defined curls, so you don’t have to do much styling. You can use your fingers to gently fluff out the curls for added volume. If you prefer a slightly more polished look, you can use a wide-tooth comb or fingers to separate the curls for a more defined, bouncy effect.
Time to Install: Under 10 minutes
3. Installing the BGMgirl Half Wig
If you’re looking for a lighter option that lets you keep some of your natural hair exposed, the Half Wig is an excellent choice. It’s quick to install and perfect for women who want a more natural look or need to blend the wig seamlessly with their own hair. Here’s how to install the Half Wig in no time:
Step-by-Step Guide:
1. Prepare Your Natural Hair:
Like with the full wig, start by preparing your natural hair. Since the Half Wig doesn’t cover your entire head, you’ll want to ensure that your natural hair is styled to blend well with the wig.
- For Straight or Wavy Hair: If your hair is naturally straight or wavy, you can simply leave it down or tie it in a loose ponytail at the crown.
- For Curly Hair: If you have curly hair, you might want to define your curls a bit before installing the wig, using a curl cream or gel.
2. Use a Wig Cap (Optional):
This step is optional for the Half Wig, but if your natural hair is long, it can help to keep everything in place. You can choose to skip the cap if your hair is already styled and secure.
3. Position the Half Wig:
The Half Wig comes with combs or clips inside to keep it in place. Start by positioning the front of the wig just above your natural hairline and the back at the nape of your neck. The wig should cover only the upper part of your head, leaving your natural hair visible at the bottom.
4. Secure the Wig:
Use the built-in combs or clips to secure the wig in place. Gently push the combs into your natural hair for a secure fit. If the wig feels loose, adjust the straps or combs until it feels snug but not too tight.
5. Blend Your Natural Hair:
To ensure the wig looks as natural as possible, take the edges of your natural hair and blend them into the wig. You can lightly curl or smooth the top layer of your hair to make the transition seamless. If needed, use a small amount of hair product (like a light mousse or hairspray) to tame any flyaways.
6. Finish the Look:
Once everything is in place, style the Half Wig to your preference. Since the wig is designed to blend with your natural hair, you can wear it as is or add some finishing touches like waves, curls, or volume. You can also adjust the natural hair around the wig for a more integrated look.
Time to Install: Under 5 minutes
4. Tips for Quick Installation
Here are some helpful tips to make installing your BGMgirl Burmese Curly Wig or Half Wig even faster:
- Use a Wig Stand: If you’re short on time, keep your wig on a stand or mannequin to avoid tangling or confusion when you go to put it on.
- Keep Your Wig Ready: Store your wig properly after use to keep it in good shape. This saves you time on detangling or restyling when you’re in a rush.
- Practice Makes Perfect: The more you practice, the quicker and easier installing your wig becomes. In no time, you’ll be able to put it on in a matter of minutes.
5. Conclusion
For busy women, time is precious, and the BGMgirl Burmese Curly Wig and Half Wig provide a perfect solution for achieving a stunning look in no time. Whether you’re looking for full coverage with the Burmese Curly Wig or a natural, blended style with the Half Wig, these wigs offer convenience without compromising on quality.