Grout plays a critical role in protecting bathroom and kitchen surfaces from moisture, dirt, and structural damage. Over time, even well-maintained grout deteriorates due to constant exposure to water, cleaning products, and daily wear. When grout fails, it can lead to water damage, mold growth, and costly repairs that extend far beyond simple tile maintenance.
Homeowners should replace grout when they notice persistent discoloration that won’t clean, visible cracks, crumbling sections, or signs of moisture penetration and mold growth. These warning signs indicate that the grout has lost its structural integrity and can no longer provide adequate protection. Ignoring these indicators allows water to seep behind tiles, potentially damaging walls, floors, and subflooring.
Recognizing when grout needs replacement rather than just cleaning saves time and money in the long run. This guide explains the specific signs that indicate grout failure, the differences between repair and replacement, and practical steps to maintain healthy grout once it’s been replaced.
Clear Signs It’s Time to Replace Your Bathroom or Kitchen Grout
Grout deterioration manifests through visible damage, persistent staining, structural failure, and biological growth that cleaning cannot resolve. These indicators signal that the grout has lost its protective function and requires replacement rather than surface-level maintenance.
Cracked or Damaged Grout
Cracks in grout lines allow moisture to penetrate beneath tiles, compromising the substrate and potentially causing water damage to walls and floors. Even hairline fractures create pathways for water infiltration that expand over time.
Grout cracks typically appear due to settling foundations, thermal expansion, or improper initial installation. These fissures compromise grout integrity and can lead to loose tiles as water reaches the adhesive layer underneath.


Common crack patterns include:
- Vertical splits along grout lines
- Spider-web formations at tile intersections
- Gaps between grout and tile edges
- Complete separations creating visible voids
When homeowners notice cracked grout in multiple locations or cracks wider than a credit card edge, replacement becomes necessary. Small isolated cracks might be repairable, but widespread cracking indicates systemic failure requiring complete removal and reinstallation.
Discoloration and Permanent Staining
Grout that remains discolored after thorough cleaning has absorbed stains into its porous structure beyond surface level. Dark streaks, yellowing, or uneven coloring that persists despite scrubbing indicates the grout has degraded.
Normal cleaning removes surface dirt, but permanent staining occurs when contaminants penetrate deep into unsealed or deteriorated grout. This penetration signals that the grout’s protective seal has failed and the material itself has become compromised.
Discoloration often appears darker along high-traffic areas or near water sources. If bleaching agents or professional-grade cleaners fail to restore the original color, the grout has likely absorbed organic matter, minerals, or oils that cannot be extracted.
Loose, Missing, or Crumbling Grout
Grout that feels soft to the touch, crumbles when pressed, or falls out in pieces has lost its structural integrity. Missing grout creates exposed gaps between tiles that leave the underlying surface vulnerable to moisture damage.
Crumbling grout often results from prolonged water exposure, poor mixing during installation, or natural degradation over many years. This deterioration allows tiles to shift and become loose since grout provides essential support for tile stability.
Homeowners can test grout firmness by gently pressing a fingernail or small tool against it. If the material flakes, powders, or indents easily, it lacks the hardness required to protect tile installations. Loose tiles that rock or shift when stepped on indicate grout failure beneath the surface.
Recurring Mold, Mildew, or Odor Issues
Mold and mildew that return within days or weeks after cleaning have colonized inside the grout rather than just growing on the surface. Black, green, or pink discoloration accompanied by musty odors signals deep biological contamination.
When moisture penetrates damaged grout, it creates an ideal environment for mold growth within the porous material. Surface treatments cannot reach these internal colonies, which continue releasing spores and spreading.
Signs of deep mold infiltration:
- Odors that persist after cleaning
- Visible regrowth within 72 hours
- Fuzzy or raised texture on grout lines
- Dark patches that resist bleach treatment
Bathrooms and kitchens with chronic moisture issues often experience this problem when grout has developed microscopic cracks or lost its water-resistant properties. Replacement with properly sealed grout eliminates the contaminated material and prevents health concerns associated with ongoing mold exposure.
Choosing Grout Replacement and Maintaining Healthy Grout
Deciding between grout repair and full replacement depends on the extent of damage, while selecting appropriate grout types and proper installation techniques ensure durability. Regular maintenance extends grout life and prevents costly future repairs.
When to Regrout Versus Fully Replace
Minor discoloration or surface staining typically requires cleaning rather than regrouting. When grout shows superficial dirt but remains structurally sound, professional-grade grout cleaners can restore appearance without removal.
Regrouting becomes necessary when grout has developed shallow cracks, minor crumbling, or persistent staining that cleaning cannot remove. This process involves removing the top layer of damaged grout (typically 1/8 to 1/4 inch deep) and applying new grout over the remaining base.
Full grout replacement is required when damage extends beyond surface level. Deep cracks, widespread crumbling, water seepage behind tiles, or uneven tile movement all signal complete failure. Shower grout that allows water penetration needs complete removal and replacement to prevent structural damage.
The presence of black mold growth deep within grout lines indicates moisture has compromised the grout’s integrity. This situation demands full replacement rather than surface regrouting to eliminate health hazards and prevent tile substrate damage.
Selecting the Right Grout Type
Cement-based grout remains the most common choice for bathroom and kitchen applications. This grout type comes in sanded and unsanded varieties, with sanded grout appropriate for joints wider than 1/8 inch and unsanded for narrower spacing.
Sanded grout provides strength for larger joints but can scratch polished surfaces like marble or glass tiles. Unsanded grout works better for delicate tile materials and tight grout lines but lacks the structural support needed for wide joints.
Epoxy grout offers superior water resistance and stain protection compared to cement-based options. This two-part grout requires precise mixing and quick application due to its short working time. Epoxy grout costs more and demands careful installation but provides exceptional durability in wet areas.
Grout Type | Best For | Water Resistance | Durability | Difficulty |
Cement-based (sanded) | Joints >1/8 inch | Moderate | Good | Easy |
Cement-based (unsanded) | Joints <1/8 inch | Moderate | Good | Easy |
Epoxy | High-moisture areas | Excellent | Excellent | Difficult |
High-traffic kitchen floors benefit from sanded cement-based grout, while shower grout applications often perform better with epoxy formulations.
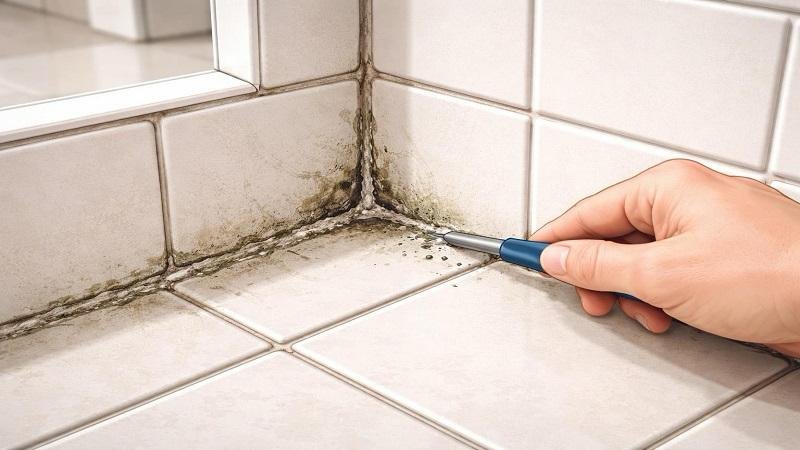
Removing Old Grout and Preparing Surfaces
A grout saw or oscillating grout removal tool removes old grout effectively. Manual grout saws cost less and provide better control for small projects, while powered tools speed up larger jobs.
Remove old grout to a depth of at least 1/8 inch, though 1/4 inch provides better adhesion for new grout. Work carefully to avoid chipping tile edges, especially with ceramic or porcelain materials. The grout removal tool should cut cleanly down the center of joints.
After grout removal, vacuum all dust and debris from the joints. Wipe tiles with a damp cloth to remove remaining particles that could prevent proper adhesion. Allow surfaces to dry completely before applying new grout.
Check for uneven tile during preparation. Loose tiles must be reset and allowed to cure before grouting. Water-damaged substrates require repair to prevent future grout failure.
Ensuring Long-Lasting Grout with Proper Maintenance
Apply grout sealer to cement-based grout 48-72 hours after installation. This protective layer prevents water absorption and staining. Reapply sealer every 6-12 months in high-moisture areas like showers.
Regular cleaning prevents buildup that degrades grout over time. Use pH-neutral grout cleaners weekly rather than harsh acidic or alkaline products that erode grout. A soft brush removes dirt without damaging the grout surface.
Address spills immediately to prevent staining. Colored liquids and oils penetrate unsealed grout quickly, making removal difficult after they set.
Proper ventilation in bathrooms reduces moisture exposure that accelerates grout deterioration. Run exhaust fans during and after showers to minimize humidity levels. Fix leaking faucets or showerheads promptly to prevent constant water contact with grout lines.