Introduction to Nail Art Tools
Nail art is more than just a beauty trend; it’s a vibrant form of self-expression that allows you to showcase your creativity. Whether you’re looking to add some flair to your everyday look or make a bold statement for a special occasion, having the right nail art tools can elevate your designs from simple polish to stunning masterpieces. With so many options available, knowing which tools are essential and how to use them effectively is key. Dive into the colorful world of nail artistry with us as we explore everything you need to know about nail art tools—your ultimate guide awaits!
- Introduction to Nail Art Tools
- Essential Tools for Nail Art Tools
- Different types of nail art tools – brushes, dotting tools, sponges, etc
- How to use each tool effectively
- Tips and tricks for beginners
- DIY Nail Art ideas using basic tools
- Advanced techniques and tools for more intricate designs
- Maintenance and care for nail art tools
- Top brands and where to buy nail art tools
- Conclusion
Essential Tools for Nail Art Tools
Creating stunning nail art starts with having the right tools. Essential nail art tools are your best friends in achieving flawless designs.
First on the list is a good quality base coat and top coat. These products not only protect your nails but also provide a smooth canvas for your artwork.
Next, invest in various brushes. A small detail brush allows you to create intricate patterns, while a flat brush helps cover larger areas.
Don’t overlook dotting tools; they’re perfect for adding dots of color or creating delicate floral designs.
A palette is handy for mixing colors, while nail tape can help achieve clean lines and geometric shapes effortlessly.
Don’t forget about a cleanup brush or corrector pen to fix any mistakes quickly. Having these essential tools will set you up for success in your nail art journey!
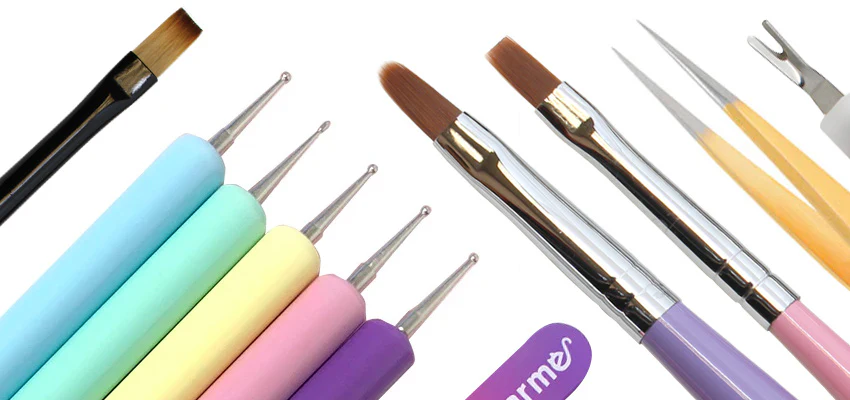
Different types of nail art tools – brushes, dotting tools, sponges, etc
Nail art tools come in various shapes and sizes, each serving a unique purpose. Brushes are essential for painting intricate designs or creating smooth gradients. A fine detail brush can do wonders for those delicate lines.


Dotting tools add flair to your nail art by allowing you to create perfect dots of different sizes. They’re fantastic for floral patterns or polka dots, making them a favorite among many artists.
Sponges are incredible when it comes to blending colors on the nails. Simply dab them onto the polish for an effortless ombre effect that looks professionally done.
Stampers bring another layer of creativity with pre-designed patterns that transfer seamlessly onto your nails. They’re ideal if you’re looking to achieve complex designs without the fuss of freehand drawing.
Each tool has its own charm, enabling endless possibilities in nail design!
How to use each tool effectively
Using nail art tools effectively can elevate your designs. Start with brushes. A fine detail brush is perfect for intricate patterns, while a flat brush is ideal for filling in large areas. Always load your brush lightly to avoid excess polish.
Dotting tools offer versatility. Use the larger end for bold dots and the smaller end for delicate accents. Practice varying pressure to create different sizes effortlessly.
Sponges are fantastic for gradient effects. Dab gently onto the nail after applying polish on them, ensuring an even blend of colors without harsh lines.
Tape can be a game-changer when creating straight edges or geometric shapes. Apply it carefully before painting over; just peel away once dry.
Ensure you clean your tools immediately after use with acetone or rubbing alcohol to maintain their lifespan and performance, setting yourself up for future success in every design.
Tips and tricks for beginners
Starting with nail art can feel overwhelming, but don’t worry. Here are some tips to help you ease into the creative process.
First, practice on a fake nail or even paper. This allows you to experiment without the pressure of perfection. It’s all about finding your style.
Keep your designs simple at first. Mastering basic shapes like dots and lines will build your confidence for more complex patterns later on.
Use painter’s tape around your nails when trying out intricate designs. This helps create clean edges and makes cleanup easier.
Don’t forget to use a top coat after finishing your design! It not only adds shine but also protects your artwork from chipping.
Always have fun with it! Mistakes can lead to unexpected creativity. Embrace them as part of the learning journey.
DIY Nail Art ideas using basic tools
DIY nail art can be both fun and creative, even with just a few basic tools. Start with a simple dotting tool or the end of a bobby pin to create polka dots. Choose two contrasting colors for an eye-catching effect.
For stripes, use tape as your guide. Paint one color over the nails, let it dry, then peel off the tape for clean lines. This technique is perfect for geometric designs.
If you have sponges lying around, you can easily create an ombre effect. Dip the sponge in two complementary shades and dab it onto your nails for a soft gradient look.
Using a fine brush? Try freehanding flowers or swirls on your base coat. Simple shapes like hearts are also easy to master and add charm to any manicure.
Experiment with glitter or metallic accents using these basic tools to elevate your DIY nail art game!
Advanced techniques and tools for more intricate designs
For those ready to elevate their nail art skills, advanced techniques can transform simple designs into intricate masterpieces. A fine detail brush is essential for precision work. It allows you to create delicate lines and patterns that standard brushes can’t achieve.
Consider using a fan brush for texture effects or an acrylic palette to mix colors seamlessly. Stamping plates are another fantastic tool, enabling you to transfer complex designs effortlessly onto your nails.
Marbling techniques add depth and uniqueness. By swirling different polish colors together, you can craft beautiful abstract looks. Nail foils also bring a luxurious touch; they reflect light beautifully when applied correctly.
Don’t underestimate the power of gel polishes for long-lasting results. They offer durability while allowing for stunning finishes with top coats that shine like glass. Embrace these tools and watch your creativity flourish!
Maintenance and care for nail art tools
Caring for your nail art tools is essential for longevity and performance. After each use, make it a habit to clean your brushes and dotting tools with warm soapy water or specialized brush cleaner. This prevents polish buildup and keeps bristles in shape.
For sponges, rinse thoroughly after use. Avoid letting polish dry on them as this can ruin their texture. Store them flat to maintain their form.
Regularly check the condition of your tools. If you notice frayed edges or hardening materials, it may be time to replace them.
Keep everything organized in a dedicated case or container that protects against dust and damage. A tidy workspace enhances creativity too!
Always allow your tools to air dry completely before storing away; moisture can lead to mold growth over time.
Top brands and where to buy nail art tools
When it comes to nail art tools, choosing the right brand makes a significant difference in your experience and results. Some of the top brands known for quality include OPI, Essie, and Sally Hansen. They offer an array of brushes, dotting tools, and more.
For those looking for professional-grade options, look into brands like Nail Art Society or Born Pretty. These companies specialize in innovative designs that cater to both amateurs and experts alike.
You can find these products at major retailers such as Ulta Beauty or Sephora. Online shopping is another great option; sites like Amazon have extensive collections with customer reviews to guide your purchase decisions.
Don’t forget about local beauty supply stores! They often carry unique items not found elsewhere and provide a chance to see tools up close before buying them.
Conclusion
Nail art tools are essential for anyone looking to express their creativity through nail designs. With the right tools in hand, you can create stunning looks that showcase your personality and style. Whether you’re just starting or have been practicing for a while, understanding how to use these tools effectively will take your nail art skills to new heights.
From brushes and dotting tools to sponges and striping tape, each tool serves a unique purpose in creating intricate patterns and designs. As you experiment with different techniques, you’ll discover what works best for you. Remember that practice is key; don’t hesitate to try out various DIY ideas using basic items around your home.
As you advance in your nail art journey, consider investing in high-quality tools from reputable brands. Proper maintenance of these items will ensure they last longer and perform better over time.
With passion and persistence, you’ll find joy in crafting beautiful nails that not only elevate your look but also serve as an outlet for self-expression. So gather those nail art tools and let your imagination run wild!