Introduction
A driveway often serves as the first impression of a home or commercial property. It’s more than just a surface to park vehicles—it’s a practical necessity that also contributes to aesthetics, property value, and safety. Whether upgrading an existing driveway or starting from scratch, understanding the process of proper planning and execution is key to long-term success.
Driveway construction involves more than just pouring concrete or laying asphalt says Apex Property Management. It requires attention to soil conditions, climate, drainage, design, and usage requirements. A well-constructed driveway can last for decades with minimal maintenance, while a poorly executed one can deteriorate within a few years, leading to costly repairs.
This comprehensive guide will walk you through every essential aspect of creating a driveway—from planning and materials to execution and upkeep—so you can make informed decisions and invest in a durable, functional surface that adds value to your property.
Why a Quality Driveway Matters
A properly constructed driveway offers several important benefits beyond vehicle access:
- Enhanced curb appeal – It creates a polished, professional look for your property.
- Increased safety – A smooth, even surface prevents trips, falls, and vehicle damage.
- Improved functionality – A well-designed driveway accommodates your vehicles, turning needs, and foot traffic.
- Added property value – Buyers often consider driveways a selling point during resale.
For these reasons, driveway construction should be treated as a serious project rather than a quick fix or afterthought.
Planning Your Driveway Project
Proper planning lays the groundwork for a successful build. Here are the core elements to consider before starting construction.
1. Site Analysis
- Soil condition: Sandy, clay-heavy, or expansive soils may need specific base preparation.
- Topography: Steeper areas require different grading strategies and materials to ensure traction and prevent erosion.
- Drainage: Water must flow away from the house and driveway to avoid pooling and damage.
2. Usage Requirements
- How many vehicles will the driveway support?
- Will it need to accommodate heavy loads (like RVs or delivery trucks)?
- Will there be pedestrian traffic or children playing on the surface?
Answers to these questions will determine the appropriate materials and thickness of the driveway layers.
3. Design Preferences
Consider the aesthetic and functional design:
- Straight, circular, or curved layout
- Inclusion of turning areas or extra parking
- Borders, inlays, or decorative surfaces
- Lighting and landscaping elements
A thoughtfully designed driveway can complement your architecture and enhance the entire property.
Selecting the Right Materials
The material you choose will impact the appearance, cost, durability, and maintenance needs of your driveway. Common options include:
Concrete
- Pros: Durable, low-maintenance, and versatile in appearance.
- Cons: Can crack over time due to soil movement or freeze-thaw cycles.
Asphalt
- Pros: Quick to install, flexible in cold climates, and cost-effective.
- Cons: Requires periodic sealing and may soften in extreme heat.
Gravel
- Pros: Affordable and easy to repair.
- Cons: Loose surface can shift, develop ruts, and require frequent upkeep.
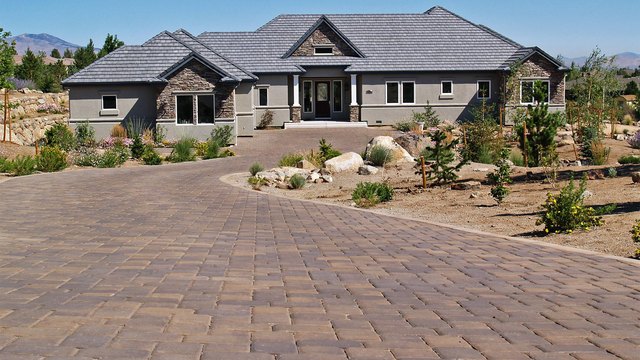
Pavers or Brick
- Pros: Highly attractive and customizable.
- Cons: Expensive and time-intensive to install; weeds can grow between joints.
Permeable Pavers
- Pros: Great for stormwater control and eco-friendly.
- Cons: Higher cost and can require more maintenance to keep pores clear.
Each material serves different needs, and choosing the right one depends on your goals for cost, style, and performance.
The Driveway Construction Process
While materials and site conditions may vary, most driveway projects follow these fundamental steps:
1. Excavation
- Existing surfaces, vegetation, and topsoil are removed.
- Excavation typically goes 8 to 12 inches deep, depending on material choice and soil conditions.
2. Subgrade Preparation
- The subgrade is the compacted natural soil beneath the driveway.
- Weak or unstable soil is replaced or stabilized with geotextiles or compacted stone.
- Proper compaction ensures the base doesn’t settle unevenly over time.
3. Base Installation
- A crushed stone or gravel base (4–8 inches) is added and compacted in layers.
- This base supports the load of vehicles and distributes weight evenly.
- For high-traffic or heavy-duty driveways, a thicker base may be required.
4. Surface Application
This is where the chosen material is installed:
- Concrete is poured, leveled, and allowed to cure.
- Asphalt is rolled hot onto the base.
- Pavers are laid over a sand or gravel bed and compacted.
- Gravel is layered and smoothed, often with a border to keep it in place.
5. Finishing Touches
- Sealing (for asphalt and concrete) protects the surface from water and chemicals.
- Edging materials prevent erosion and keep the shape defined.
- Drainage systems (like trench or channel drains) are added where needed.
Drainage and Slope Design
One of the most common mistakes in driveway construction is improper slope or drainage. A minimum slope of 1–2% (or 1 inch per 8–10 feet) is generally recommended to direct water away from structures and prevent pooling.
Drainage options include:
- Swales or ditches alongside the driveway
- Channel drains across the width to collect surface water
- Permeable surfaces to absorb water directly
Ignoring drainage needs can lead to premature cracking, erosion, and frost damage.
Driveway Maintenance Tips
Even the most professionally built driveway requires some level of maintenance:
- Inspect for cracks annually and fill them early to prevent spreading.
- Sealcoating asphalt every 3–5 years can extend its life.
- Clean stains from oil or rust quickly to avoid permanent damage.
- Keep edges clear from grass and weeds that can break down borders.
- Re-grade gravel driveways yearly to fill ruts and restore shape.
By keeping up with minor maintenance, you can prevent costly repairs and maintain the value of your investment.
Common Mistakes to Avoid
Avoiding these pitfalls will help ensure the long-term success of your driveway:
- Insufficient base compaction – Leads to sinking or shifting.
- Poor water management – Causes erosion and structural failure.
- Ignoring expansion joints in concrete – Results in unsightly cracks.
- Using the wrong material for your climate – Reduces lifespan and increases maintenance.
- Underestimating cost – Always include extra in your budget for contingencies.
Working with experienced professionals, or following best practices in DIY projects, is essential to sidestep these common issues.
Customization and Design Enhancements
To go beyond the basics, consider upgrades and design features such as:
- Decorative scoring or stamping for concrete
- Colored sealers or tints for a customized appearance
- Inlaid stone or border pavers
- Integrated lighting for safety and ambiance
- Landscaping accents like flower beds or trees to frame the driveway
These additions not only elevate the visual appeal but can also improve functionality and safety.
Conclusion
Building a driveway is an investment in both form and function. The key to success lies in thoughtful planning, appropriate material selection, proper site preparation, and attention to detail during installation. When all these elements come together, driveway construction becomes a process that pays off in durability, aesthetic value, and long-term satisfaction.
Whether you choose concrete for its durability, asphalt for its affordability, or pavers for a touch of elegance, the foundation of a great driveway is smart construction. Take the time to do it right, and your driveway will serve you well for many years to come.


